Showing posts with label Scrub. Show all posts
DIY Lip Exfoliator

DIY Lip Exfoliator


You Need:

- 1 tbsp honey,
- 1 tbsp brown sugar
- 1 tbsp olive oil

DIY Lip Exfoliator

Mix together, gently apply to lips and let sit for about 2 minutes then rinse using cool water.

This is a great lip exfoliator trick that you can do at home in under 20 minutes.

The mixture smells nice and tastes sweet to. Try not to eat too much.
Read More
Brown Sugar Lip Scrub

Brown Sugar Lip Scrub


Really easy and fun DIY to make your own lip scrub using brown sugar that feels amazing! Removes dead skin, great for chapped lips and leaves your lips feeling super soft. Best part is when you are all done you can lick off and eat any remaining mixture.

Brown Sugar Lip Scrub

What You’ll Need:

- 1 tbsp. Honey
- 1 tbsp. Brown Sugar
- 1 tsp. Olive Oil 
- 1 tsp. Vaseline (optional)
- Food Coloring (optional)

What to Do:

- In a small bowl, add ingredients and mix together thoroughly. If using food coloring, you will only need 2-3 drops.

- You can also add a few drops of juice from a freshly squeezed lemon to give your scrub an extra kick! This of course is completely optional.

- Apply a small amount to lips and and gently exfoliate for 2 minutes using your finger.

- Rinse with warm water and lightly pat dry with a hand towel.

The food coloring is if you wanted to add a cute red or pink color to your scrub, but you don’t have to use it if you don’t want to. If you are using food coloring, you will only need a couple drops.

Please Read: Do not eat the mixture if you are using Vaseline. You don’t have to use it, but if you do, make sure not to eat it!
Read More
3 Ingredient Peppermint Lip Scrub

3 Ingredient Peppermint Lip Scrub


This stuff is excellent, you guys. Here’s a couple great benefits of this super easy lip scrub.

- Plumps up your lips without any chemicals!
- Leaves them moisturized because of the oil.
- The peppermint essential oil in it nourishes dull skin and improves the texture of oily or greasy skin. (use the code NOUVELLE for 20% off!)
- Scuffs off the dead skin on the lips for a fresh plump alternative!

3 Ingredient Peppermint Lip Scrub

Now let’s talk about how I made it. It’s so easy. I wanted to make it supa simple so that one: you guys will want to make it and two: that it is practical for you guys to make it. I’m really always thinking about you. đŸ˜‰ You’re welcome.

So here’s what you’ll need:

- 1/4 C Cane sugar (stay away from refined white sugar)
- 3-5 drops Peppermint Essential Oil
- 4 Tbsp Coconut oil (or other carrier oil)

Now when I share a tutorial for a beauty DIY I like to share why each thing is beneficial to your skin & why I chose it. The cane sugar is for the exfoliation, obviously, and is a better choice than refined white sugar which has basically ‘refined’ any benefits out of it. I chose sugar because if it were to get in your mouth, you’d be okay! It’s large enough and strong enough to scrub away the dead skin.

I chose peppermint oil because it’s the season and it smells lovely. There are some skin benefits too! Like I mentioned, it nourishes dull skin and improves the texture of the skin as well. Who wants dull lips? It also creates a cooling sensation which his good for your skin.

You basically melt the coconut oil slowly in a double broiler sort of way (I totally make-shift mine) and then add the peppermint oil. Be careful not to add too much, it is strong! Also make sure you’re not allergic or even that your skin isn’t sensitive to it. Then once it’s cooled a bit, mi in the sugar and you’re done!


Well, what do you think? Will you give this one a try? I hope you get to and maybe even make some little gifts from them! It’s really super yummy and your lips feel amazing afterward.

Enjoy and I hope you’re having a fabulous beginning of the week!
Read More
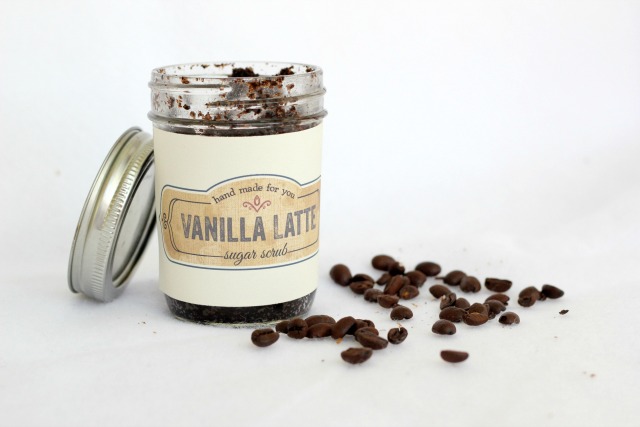
Vanilla Latte Homemade Sugar Scrub

Vanilla Latte Homemade Sugar Scrub


So lately I’ve been playing with homemade products. I’ve made a foot scrub, face wash from oils, and — what I’m going to share today — homemade sugar scrub! It’s so easy I almost feel bad posting about it. But everyone has to start somewhere, and if you’re one who just likes to be told what to put together, then this is perfect for you.

All of the ingredients for this homemade sugar scrub you’ll find in your pantry, I guarantee it. Also you’ll see why I called this a ‘vanilla latte’!

Vanilla Latte Homemade Sugar Scrub

Here is what you’ll need for your very own homemade sugar scrub:

- Ground coffee (I used whole beans & grind them myself)
- Brown Sugar
- Baking Soda
- Oil of your choice
- Vanilla extract
- Cinnamon (optional)

You guys, it’s this simple – add all the dry ingredients and mix until they’re all blended. Then drizzle in the oil until you get the consistency you want. I used 1/4 cup of each coffee grounds and brown sugar, 1 tsp of baking soda, 1 tsp of vanilla extract (adjust to the scent of your liking) and about 1/4 olive oil because that was the best oil I had on hand. You can adjust the amount of olive oil to fit the texture you want. I drizzled mine in until I was happy with it.


Here’s why I choose these ingredients:

Coffee Grinds: I used coffee as the base for this homemade sugar scrub for your body because it’s known to reduce inflammation, get rid of cellulite (even if just temporarily), and has been linked to reducing skin cancer.

Brown Sugar: It’s funny because I high sugar diet obviously isn’t that great for you, but topically it’s actually good for you! Sugar moisturizes, it breaks down the cells and regenerates the skin, and exfoliates! Brown sugar isn’t as harsh as refined white sugar so it can be used on your face, but paired with coffee, which is a little more harsh, this particular homemade sugar scrub is a body scrub.

Baking Soda: This adds to the exfoliation and also helps with cleansing. You don’t need a lot of it, you already have other exfoliates, this just adds a little extra.

Cinnamon: This yummy spice is known to help prevent infection and kill bacteria. You should not add cinnamon directly to your skin, it could result in a burning sensation. It also gives a yummy smell!

Olive Oil: It is great for dry skin as it moisturizes and isn’t know to cause allergic reactions. It also is known to protect your skin from sun damage.

Vanilla Extract: For the scent!


These are perfect for yourself or little gifts for friends. Just fill up a small mason jar, slap a cute label on and you’re good to go! It’s also perfect for this summer as the weather gets hotter and dryer.

I hope you like this Vanilla Latte Homemade Sugar Scrub!
Read More
Brown Sugar Lip Scrub

Brown Sugar Lip Scrub


As soon as I spend anytime outside in the winter, I get dry lips.  Even if I am slapping lip balm on religiously, I still end up with a few dry spots or chapping.  No fun.  This is a simple exfoliating lip scrub that can help to remove the dead skin and moisture your lips.  And, you might have all the ingredients in your kitchen right now!

Brown Sugar Lip Scrub

To make a batch of this lip scrub, combine 1 part honey, 1 part melted coconut oil, and 1 part brown sugar into a small bowl.    Begin by mixing the ingredients together as well as you can.  The coconut oil won’t want to play nicely with the other ingredients, but that’s okay.  Place the bowl in the fridge for a few minutes to help the oil solidify a bit.


Take the bowl out of the fridge and keep mixing with a fork.  You can see that the oil is solidifying and turning white.


You can stop mixing when the scrub looks like this.  It should have the same consistency as when you cream butter and sugar for a cookie dough.


You will want to store the lip scrub in a jar with a secure lid.  If the temp gets above 76 degrees, the oil will start to melt and that could get messy.  You can buy small lip pots online or you can thoroughly clean out an old makeup jar.


To use, take a very small amount of the scrub and place it on your lips.  Rub the scrub in small circles all over your lips.  Your body heat will cause the oil to melt into your skin as the brown sugar exfoliates any dead skin cells.  Rinse the scrub off (don’t wipe super hard or you will wipe off the oil!) and enjoy your soft smooth kisser!


Read More
DIY Vanilla Sugar Lip Scrub

DIY Vanilla Sugar Lip Scrub


This is a super fun and easy Homemade Beauty project- DIY Vanilla Sugar Lip Scrub! Plus it super inexpensive to make and you probably already have all the ingredients you need.

DIY Vanilla Sugar Lip Scrub

I use a lip scrub a few times a week to help exfoliate and smooth the lips. For this recipe you only need 3 ingredients.


What I Used:

-Sugar (I used white granulated sugar)
-Coconut Oil (Olive Oil would also work)
-Vanilla Extract

There are so many variations you could do…you could use brown sugar or you could use peppermint extract if you prefer it over vanilla. You could totally get creative with this.

As for the container….I grab a 2 pack at Walmart for around a buck! (Found in the travel section)


Directions:

Combine ingredients and mix well. As for the ratio of sugar to coconut oil…that is totally going to depend on the oil you use and the texture you want. I would say it is close to 1 to 1 ratio.


Here is a close up of the texture. You want it to hold together a bit. I added 2 drops of vanilla. This will be a personal preference thing too.


Scoop your mixture into your container and vĂ³ila (wah-la)!

I will admit this lip scrub tastes fabulous. My four year was curious about it and I let him try it…he told me it was delicious and wanted more.

I think this would not only make a fun handmade gift, but would also be fun for a girls party. The ingredients are inexpensive and  natural. It is so easy to make.
Read More
DIY Cucumber Mint Sugar Scrub

DIY Cucumber Mint Sugar Scrub


When I opened my window this morning there were no waves crashing, and no sun light pouring over my sun kissed face. Sigh. Instead there were deer staring at me from the woods with their heads cocked to one side as if to say “where are my tomatoes lady?” Ha! I of course answered them (loudly) and said no tomatoes for YOU and promptly jumped back into bed. In case that last sentence makes no sense to you those darling deer ate most all of my raised bed tomatoes last year despite my best efforts to ward them off, which did not include a gun, not that I’m against that, I’m just not a fan of deer meat. This year, I’ve claimed the deck as my own garden and the tomatoes are almost as tall as I am in their containers. Take that deer!

DIY Cucumber Mint Sugar Scrub

We’ve been on vacation for the past two weeks, first the mountains and then the beach. It was just what we needed. Time to decompress, unplug, put together puzzles, laugh at silly jokes and just hang out. I’m super refreshed and relaxed. Well until I look at my inbox and then I get slightly tense so I’m avoiding it at the moment. Beach time means my skin could use a little spa time. Because we just paid for said vacation that means no spa time for me at the moment. No worries, instead I whipped up a quick and refreshing cucumber and mint sugar scrub which is going to do the trick nicely and for ehem pennies.

And if you happen to have any cucumber left over place a few slices on your eyes. Or use it in a salad (but not if you’ve put it on your eyes because well ew) up to you!


What You Will Need:

- 1 large cucumber
- 2 tablespoons fresh mint leaves
- 2 1/2 cups Dixie Crystals granulated sugar
- 4 tablespoons extra virgin olive oil

What To Do:

-  Place cucumber and mint into blender. Puree.
- Into a medium bowl add: sugar, puree and olive oil. Stir until combined. NOTE: if you prefer mixture more firm add additional sugar.
- Divide mixture between desired storage containers and store in refrigerator until ready to use.
Read More
DIY Coconut Lime Foot Scrub

DIY Coconut Lime Foot Scrub


I don’t know about you, but during summer my feet can take a beating. Sandals all day everyday except for when playing volleyball, swimming, heck – sometimes I don’t even put on shoes! So I thought it’d be fun to come up with a homemade foot scrub to help heal and rejuvenate your feet this summer. It also makes a super cute gift!

It’s very easy to make too. Here’s what you’ll need and why it’s good for your skin/feet:

*Coconut Oil – This super oil is great for your skin & very hydrating. For more benefits, you can read this article.

*Epson salt – It’s a natural exfoliant and anti-inflammation remedy that’s great to treat dry skin, sore muscles, small wounds and even to fight illness. Anyone else’s feet sore at the end of the day? That’s why I used it as an exfoliant in this recipe.

*Limes for their zest – It’s known to rejuvenate skin, protect from infection & reduce odor! (maybe you’re husband will like this scrub too!)

*Baking soda – Helps protect feet from microbial infections & bad odor.

*Lime Essential Oil – Helps reduce pain and makes the scrub smell lovely.

*Citrus zester (or cheese grater if you don’t have one) – Just to zest the limes.

*Glass containers – To package it all pretty!

DIY Coconut Lime Foot Scrub

You can probably figure it out from the pictures and the measurements are workable but here’s what I did.
  1. Start by using a double broiler or two glass containers to heat the coconut oil. Put hot water in one glass bowl and then set the other glass bowl on top. Heat it through until it’s entirely a liquid. About 2 Tbsp for a half a cup of Epson salt. You can adjust this with how oily you want it. I wanted more of a scrub.
  2. Add the Lime Essential Oil and mix completely. Just a couple drops!
  3. Add the Epson salt and baking soda and mix together. I added 1/2 cup of Epson salt and 1 Tbsp of baking soda.
  4. Zest of one lime over it all and blend. It smells lovely!
  5. Voila! You’ve got a lovely smelling and great for your foot scrub!


This scrub can be used other places but know that Epson salt is one of the heavier exfoliants used and it’s probably best used on the feet where our skin is a bit tougher. Also lime essential oil can (but not always) cause photo-sensitivity to the sun, which could be a bummer. That’s why I think it’s best for your feet! And obviously, if you use this in the shower, it will make the bottom of your shower slippery! It’s probably best to use in a tub and then add warm water to rinse & soak.

So take your feet on a nice relaxing trip to the islands, they’re been working hard, they deserve it!
Read More